 on the toolbar.
 The Parametric Settings dialog can be accessed by clicking on the Parametric settings icon on the toolbar.
You can use this dialog to set up the optimisation problem by entering data on the tabs described below:
These tabs contain respectively tables of the objectives, additional outputs, constraints and design variables to define the optimisation problem.
There are 3 types of analysis and these can be set from the first tab on this dialog.
The analysis to select for optimisation is 2-Optimisation.
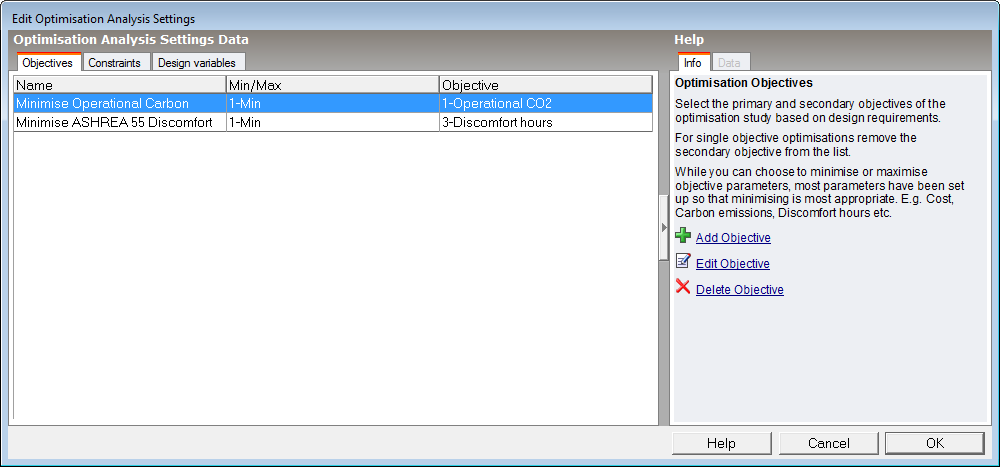
The Objectives tab allows you to define how the "success" of a particular design is be measured. This is done by defining either 1 or 2 objectives for the analysis. Typical settings here might include 2 objectives to investigate the trade off between 2 conflicting objects such as minimising both construction cost and energy consumption. See screenshot below.
Controls on the Info panel are:
It is only possible to have 1 or 2 objectives and the number of objectives (1 or 2) radically affects the nature of the analysis. With a single objective optimisation there is no trade off between 2 objectives, but simply a requirement to select designs that give highest or lowest values of the objective KPI.
The additional outputs tab allows you to define some extra outputs to be included in the table of results for each iterative design variation simulated. This can help in the final analysis of results to gain a clearer understanding of how variations in the design will impact on the building performance.
Any number of Additional outputs can be added.
Controls on the Info panel are:
The Constraints tab allows you to define limits on the performance of the building. Examples of constraints that might be applied to an optimisation analysis are "Discomfort hours must be less than 200" or "Construction cost must be greater than $6m".

Any number of constraints can be added, or the analysis can be run without constraints.
Controls on the Info panel are:
The variables tab allows you to define the elements of the building design that can be allowed to vary as well as the allowed values that the variable can take on during the analysis. You can select from a wide range of variables such as Window to wall %, Heating setpoint temperature, HVAC Template, External wall construction etc.
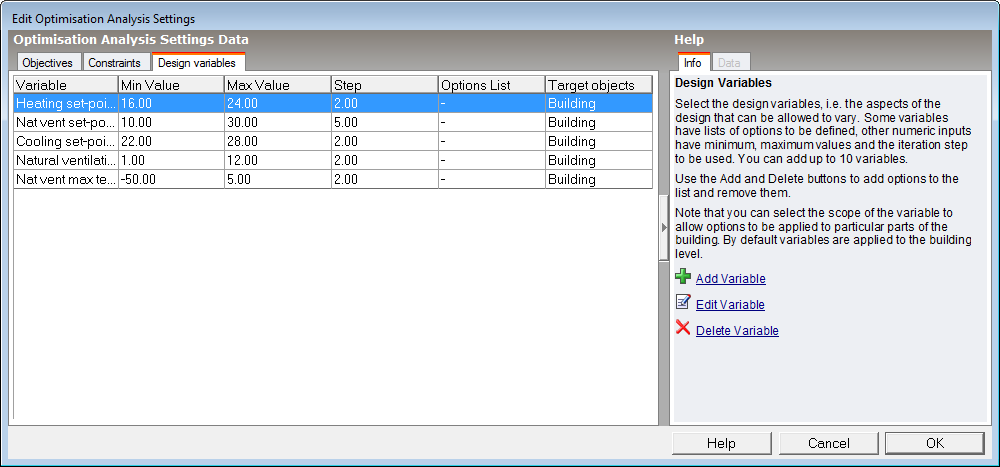
Note: the data in the Min and Max Value columns are always displayed in SI units even when IP units are being used.
List data types such as constructions, glazing or templates require a set of options to be selected to define the allowed variable options.
Any number of variables can be added.
Controls on the Info panel are:
Tip: If you aren't sure whether some variables should be included in an optimisation or not, you can include them and then use Sensitivity Analysis tools to make a statistical assessment of whether the variable has a meaningful impact on the aspects of building performance that are under consideration. If not then the variable should be removed from the list and so excluded from future analyses.
When using templates as Design variables in Parametric, Optimisation, or UA/SA Analysis, the order in which the variables are added to the list can affect the results. This happen when a template and one of its attributes are both included as Design variables, in which case the variable appearing lower in the list determines the value used in the analysis.
For example, if 2 variables to be included in the list of variables are Miscellaneous power density and Activity template, the effect of variations in Miscellaneous power density will only have an impact on results if the corresponding item in the list appears below the Activity template item. This is because the variables are applied to the model in the order they are defined in the list, and, because the Activity template also loads Miscellaneous power density values, the value loaded by the template will be overridden by the value defined by the Miscellaneous power density variable.