Tariff Analysis - Ratchet Tab
Ratchet tab on Tariff Analysis dialog
Ratchets are commonly used by US utility tariffs for large commercial and industrial electricity customers as a mechanism to calculate the demand charges on monthly electricity bills. They may be used to ensure that a high demand spike in one month, or season, results in a minimum billing charge for several subsequent months, even if the customer's actual usage is lower.
Utilities charge customers based on two main components:
-
Energy Charge (kWh): the total amount of electricity consumed over the billing period.
-
Demand Charge (kW): The maximum rate at which electricity was used during a short interval within the billing period.
A ratchet is a clause in the tariff that links the demand charge for the current month to a high demand peak from a previous month or season. A typical demand ratchet determines the Billed Demand (kW amount the customer is charged for) as the greater of:
-
The actual maximum demand in the current billing month.
-
A percentage (often 50% to 90%) of the highest maximum demand in a specified "look-back" period (e.g., the previous 11 months, or the peak summer season).
Why Utilities Use Ratchets
A utility must design its infrastructure (generators, transformers, transmission lines) to handle the maximum demand of all its customers. Even if a customer only hits a high peak once a year, the utility still has to build and maintain the capacity to serve that spike year-round. Utilities use ratchets to ensure they can recover the costs of building and maintaining a reliable electricity grid, especially the capacity required to serve peak loads. Ratchets create a strong financial incentive for large customers to avoid or manage short, excessive spikes in power usage, thereby smoothing out the load on the grid and deferring the need for costly infrastructure upgrades.
 Ratchet Example 1
Consider a tariff has a ratchet set at 80% of the highest peak demand in the previous 11 months.
-
January: The customer uses its equipment heavily and hits a peak demand of 1,000 kW. This sets a new high mark.
-
February - December (Next 11 Months):
-
The ratchet "locks in" a minimum billed demand of 80% of that $1,000 kW peak, which is 800 kW.
-
If the actual maximum demand in any of these months is 500 kW, you will still be charged for the minimum ratchet amount of 800 kW.
-
If your actual maximum demand in a later month is 900 kW, which is higher than the ratchet minimum, you will be charged for the actual demand of 900 kW (and this new high may reset the ratchet minimum for the remaining months).
The effect is that one brief surge in energy use can determine the minimum demand charge you pay for nearly a full year.
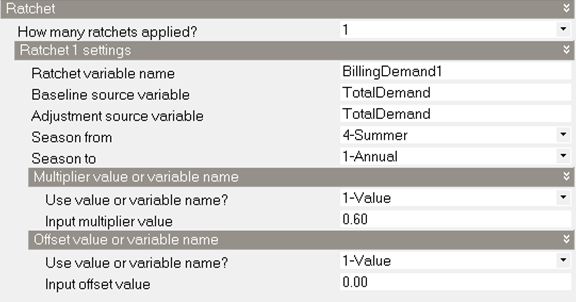
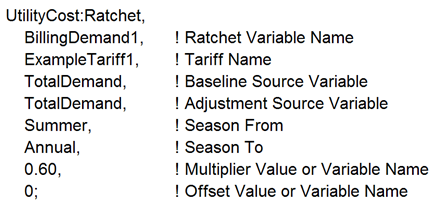
Ratchet Example 2
A utility has a single ratchet that says that the billing demand for each month of the year is the higher value of the actual demand or 60% of the peak summer demand.
DesignBuilder input:
EnergyPlus idf:
Multiple Ratchets
Multiple ratchets may be used to manage different peak concerns - like summer heat vs. year-round capacity - and they are applied sequentially to ensure the billed demand reflects the highest possible charge across all rules.
When a utility tariff contains multiple demand ratchets, they are applied in a chain or sequence. The goal is to compare the maximum demand from different look-back periods and different rules, and ultimately select the highest result as the customer's final Billed Demand. The mechanics are as follows:
-
Ratchet 1 (e.g., Annual Ratchet): The calculation for the first ratchet is performed, comparing the current month's peak to the highest peak in the previous 11 months (or the year).1 The higher of these two values becomes the interim Billed Demand, let's call it D1.
-
Ratchet 2 (e.g., Seasonal Ratchet): The calculation for the second ratchet is performed. This ratchet often compares a seasonal peak (like the highest summer peak) to the current month's demand. The Billed Demand from Ratchet 1 (D1) is used as the starting value or baseline for this comparison.
Final Billed Demand = Greater of (D1 OR a percentage of the highest kW peak during the last peak season).
Essentially, the output of the first ratchet is fed into the second, and the output of the second is fed into the third (if one exists). This layering guarantees the customer pays a demand charge based on the worst-case scenario (highest demand spike) as defined by any of the tariff's ratchet rules.
In DesignBuilder, if multiple ratchets occur in the same tariff, they can be “chained” together using the Baseline source variable replaced with the Ratchet variable name of the previous Ratchet.
Chained Example
A large commercial customer might have two ratchets:
-
Rule A (Annual): Billed Demand is the greater of (Current Month kW OR 80% of the last 11 months' highest kW)
-
Rule B (Seasonal): Billed Demand is the greater of (Current Month kW OR 90% of the highest kW peak during the previous Summer season).
The final demand is the highest result derived from both comparisons.
When Utilities Use Multiple Ratchets
Utilities employ multiple, chained ratchets when they need to recover costs that are driven by different factors at different times of the year.
1. Separating Seasonal vs. Annual Capacity Costs
The most common reason for using multiple ratchets is to distinguish between costs related to annual operations and costs related to seasonal stress on the grid.
-
Seasonal Peak Ratchet (90% Summer Rule): This rule is designed to recover the cost of peaking generation and transmission/distribution upgrades needed specifically to handle the extreme load of the hottest summer days (high air conditioning use). The high summer demand sets a high minimum for several non-summer months.
-
Annual Ratchet (80% Rolling Rule): This rule ensures recovery of costs for the base, fixed capacity that must be available year-round, regardless of the season.
2. Targeting Coincident vs. Non-Coincident Peaks
Some utilities use multiple ratchets to separate charges for:
-
Non-Coincident Peak (NCP): The customer's absolute highest kW peak for the month, regardless of when it occurs.
-
Coincident Peak (CP): The customer's kW demand measured at the exact same time as the utility's entire system hit its highest overall peak (the "system peak").
A complex tariff might use a ratchet for the NCP and a separate, chained ratchet for the CP, ensuring the customer is incentivised to lower their usage during both their individual peak and the grid's most stressed hours.
Ratchet
Ratchet variable name
This entry defines the name of the ratchet and the variable that stores the result of this ratchet. The ratchet variable name should be used wherever the ratchet should be applied and is often the source variable for Simple or Block charge objects.
Baseline source variable
The name of the variable used as the baseline value. When the ratcheted value exceeds the baseline value for a month the ratcheted value is used but when the baseline value is greater than the ratcheted value the baseline value is used. Usually the electric demand charge is used. The baseline source variable can be the results of another ratchet object. This allows utility tariffs that have multiple ratchets to be modelled.
Adjustment source variable
This field defines the variable that the ratchet is calculated from. It is often but not always the same as the baseline source variable. The ratcheting calculations using offset and multiplier are using the values from the adjustment source variable. See the bottom of this section for how ratchet works.
Season from
This is the name of the season that is being examined. The maximum value for all of the months in the named season is what is used with the multiplier and offset. This is most commonly Summer or Annual. When Monthly is used, the adjustment source variable is used directly for all months.
The choices are:
- Annual
- Winter
- Spring
- Summer
- Fall (Autumn)
- Monthly
Season to
This is the name of the season when the ratchet would apply. This is most commonly Winter. The ratchet only is applied to the months in the named season. The resulting variable for months not in the Season To selection will contain the values as appear in the baseline source variable. The choices are:
- Annual
- Winter
- Spring
- Summer
- Fall (Autumn)
Multiplier value or variable name
Often the ratchet has a clause such as “the current month demand or 90% of the summer month demand”. For this case a value of 0.9 would be entered here as the multiplier. This value may be given as one if no multiplier is needed. This can also be a variable name, which should be defined on User variables tab.
Offset value or variable name
A less common strategy is to say that the ratchet must be all demand greater than a value, in this case an offset that is added to the demand may be entered here. If entered, it is common for the offset value to be negative representing that the demand be reduced. The value can be zero if not offset is needed in the ratchet. This can also be a variable name, which should be defined on User variables tab.
Detailed step taken for ratchet calculation
- AdjSeasonal contains either:
- When SeasonFrom is not set to Monthly, the maximum for all months in Season From in the Adjustment Source Variable. This is a single value.
- When SeasonFrom is set to Monthly, the monthly values of the Adjustment Source Variable.
- AdjPeak = (AdjSeasonal + Offset) * Multiplier
- MaxAdjBase = maximum value of either AdjPeak or Baseline Source Variable
- The resulting Ratchet Variable contains:
- For months not in SeasonTo, the values of Baseline Source Variable
- For months in SeasonTo, the values of MaxAdjBase
For a simple typical case using totalDemand for both “Baseline source variable” and “Adjustment source variable”, please see the example at the top of this page.
