DesignBuilder provides interoperability with BIM models through its gbXML import capability. This allows you to import 3-D architectural models created in Revit, ArchiCAD or Microstation and other BIM systems supporting gbXML data exchange.
You can import gbXML from the site or building level using the Import BIM model toolbar icon or use the File > Import > Import BIM/gbXML model. This opens the Import BIM Model dialog. If you are at site level DesignBuilder will require you to create a building first to import the BIM model into.
Unlike the 2-D floor plan import which provides only a set of lines for tracing over, importing 3-D BIM data imports the full geometry as blocks with zones, windows, doors and shading surfaces.
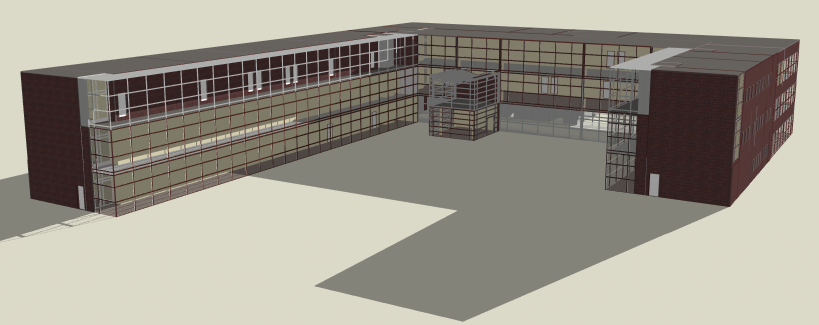
Example model imported from Revit into DesignBuilder
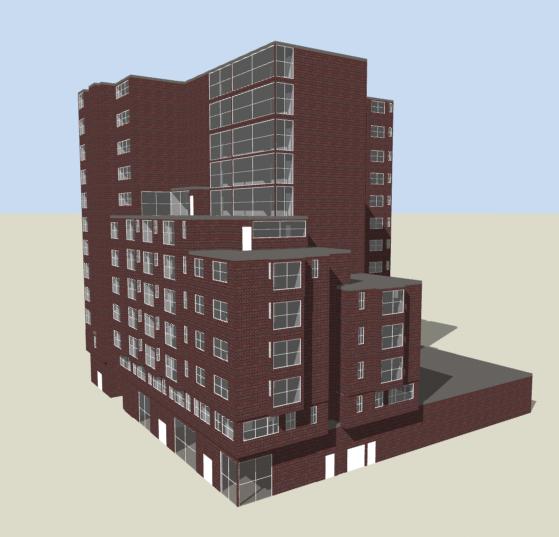
Example model imported from ArchiCAD into DesignBuilder
The Import BIM Model dialog has two pages. On the first page you can select the xml file to import. The file must use the gbXML standard data format. Once you have selected the model, press the Next button to move to the second page. For large models there will be a delay at this point while the model is loaded to the dialog. The second page shows a thumbnail view of the model along with some controls to control the way the import is to be carried out.
You can display the thumbnail of the model from various viewpoints. Select from:
The options used to control the import of the geometry depends on the version.
This option allows the method used to identify the blocks and zones in the imported model to be selected. gbXML data typically consists of a set of surfaces representing the building walls, roofs, floors etc and spaces representing the inhabitable volume of the space. DesignBuilder is able to use either or both of these surfaces and spaces and the best way to obtain the most accurate representation of the original BIM model varies depending on the model. Select from:
This option allows you to define whether the system should prioritise reduction of gaps between blocks or whether to aim to minimise likelihood of open manifold blocks being generated.
This is the maximum gap between neighbouring parallel gbXML surfaces that will be interpreted as being an adjacency between 2 spaces. You might enter a value higher than the default 0.01m if the gbXML spaces are separated by large gaps due to thick partitions or ceiling /floor voids being excluded from the gbXML. For example if the largest gap in the between spaces that are to be modelled as adjacent is 0.3m then enter 0.3m here.
The Adjacency tolerance can also be updated after the import from the Advanced tab of the Model options dialog.
This option is used to automatically identify stories by grouping adjacent spaces created by extruding from the floor plan with the same upper and lower Z coordinates into single blocks. This has the advantage of making it much easier to later modify internal layouts and it also helps to navigate around large models.
Note: It is sometimes an advantage, especially in lower quality gbXML data sets, to import raw surface geometry exactly as defined in the BIM model. In this case the Create storey blocks setting should be switched off and the Allow open manifold building blocks setting should switched on.
By default this option is selected and the geometric space data will be imported as building blocks ready for use in DesignBuilder modelling.
You can instead import BIM space geometry as outline blocks by unchecking this option. The outline blocks give an exact representation of the gbXML spaces in the gbXML and this can be useful for diagnosing problems with poor gbXML, For example if any part of a space intersects with another space then it would not created as a building block but it could still be created as an outline block.
If this option is selected then DesignBuilder will any load materials, constructions and glazing system thermal properties present in the BIM model and assign them to surfaces and windows in the model.
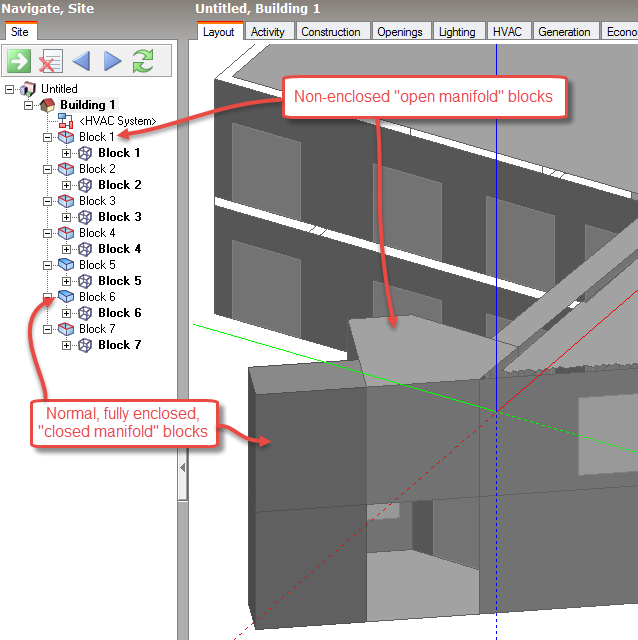
Open manifold (non-enclosed) blocks are a special type of block which are only created when models are imported from BIM. They have one or more surfaces missing which means that they are not fully enclosed and this has significant consequences on what can be done with the block in the DesignBuilder modeller and in calculations:
Tip: Open manifold blocks are shown in a lighter grey than normal closed manifold blocks to differentiate them and their icons in the Navigator have a red outline. See screenshot below.
Because Open manifold blocks cannot use all geometry operations, the orientation of their surfaces cannot be reliably determined from the model and DesignBuilder must rely on the orientation data stored with the surface from the BIM model. This data is not always reliable and so in some cases surfaces are facing in the wrong orientation. The Flip block surface orientation command can and should be used to check and, if necessary fix, the orientation of surfaces in all open manifold blocks.
Shading surfaces are specially marked in gbXML data and so can be treated separately if required. You can choose to import shading surfaces as part of the import or not using this control. Shading surfaces imported through gbXML will be 2-D flat shading surfaces.
If the above Import shading surfaces option is selected then you can choose to either merge any such co-planar surfaces or not.
The geometric information contained in gbXML includes a collection of surface and space objects which represent the outer and inner volumes of rooms in the parent BIM model respectively. The surface objects are derived from corresponding wall, ceiling, floor etc elements in the BIM and also contain openings for windows and doors. The space objects aren’t native to the BIM system but are identified by users through a manual or semi-automatic process. The result of the spatial identification process is a collection of spaces that are separated by gaps that would be filled in the parent BIM model by the BIM primitives such as partitions, slabs, etc.
Internally DesignBuilder includes 2 different ways to import gbXML data:
The DesignBuilder gbXML import works by simply mapping the gbXML space surface geometry to building blocks, one block per zone.
Depending on the method used to identify the block geometry they represent:
Note: It is important to understand that in both cases the success of the BIM to DesignBuilder data transfer process depends on how well the spatial identification process has been conducted in the BIM system. If there are intersecting or missing spaces in the BIM model then the model imported into DesignBuilder will also have problems.
The adjacency between neighbouring surfaces is calculated within DesignBuilder based on the Adjacency tolerance setting.
Constructions and glazing systems are assigned to surfaces in the gbXML and when the Import thermal properties option is selected in the import dialog the constructions assigned in the BIM program will be assigned at surface level within the imported model.
Shading surfaces in the gbXML are retained and displayed in the imported model. Other surface objects aren't normally required and are hidden after the import has been completed but can be activated as shading surfaces from the Model options dialog, Drawing tools tab.
There is a DesignBuilder plugin for the most recent versions of Revit, which can help to ease the workflow when transferring BIM models from Revit to DesignBuilder. This is installed with DesignBuilder. The version of Revit you wish to use must be installed at the time you install DesignBuilder.
You can read how to get the most from the Revit to DesignBuilder link in DesignBuilder Revit – gbXML Tutorial.