This tutorial shows you how to set up an optimisation analysis to help select a single key control parameter within an EMS script-based optimum start controller. The control parameter setting in question affects both heating energy consumption and occupancy comfort and the design curve resulting from the analysis is used to help make an informed decision on the most appropriate start up time that trades off occupant comfort on the coldest mornings of the year to help save heating energy over the whole year. A similar process can be used to help analyse the impact of one or more settings within any EMS script.
A custom EMS variable can be used in parametric processes (optimisation, parametric analysis or UA/SA) when an EMS script is used as part of the simulation model and a value in the script is to take a different value for each simulation as controlled by the parametric processor. In the example used in this tutorial, an EMS script is used to define a simple optimum start heating controller which sets the heating system morning start up time based on the outdoor temperature at 1am. The algorithm uses a simple linear control based on the earliest possible start up time and the corresponding outdoor temperature, along with the latest possible start time and its corresponding outdoor temperature. The earliest possible start up time is defined as a variable in the script with a default value of 4am. This allows the script to be used for standard simulations, in which case the optimum start controller uses an earliest possible start time of 4am. Otherwise, for optimisations, the earliest start time selected for each simulation is set by the optimisation process controller.
The tutorial model uses a default Simple HVAC fan coil unit system, though the same process would work equally well using Detailed HVAC.
1. Create a new model located at London Gatwick.
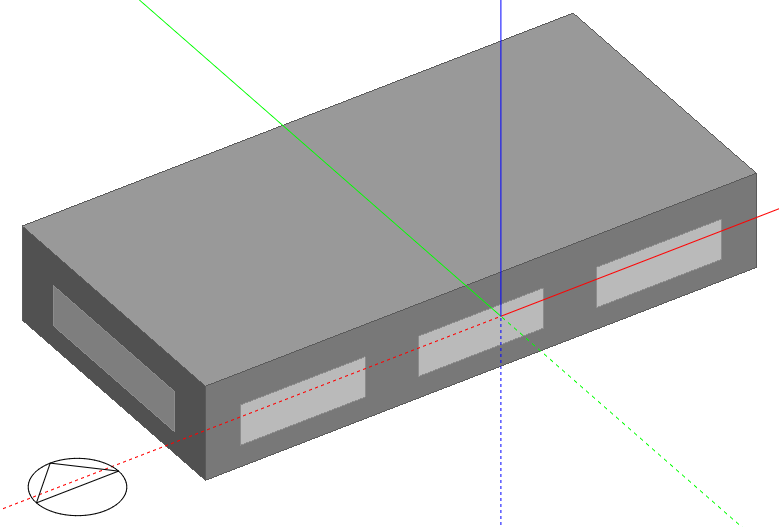
2. Add a building using default settings and draw a rectangular block measuring 20m by 10m with block height of 3.5m as shown below.
3. Load the Generic Office Area Activity template at building level on the Activity Tab.
The script to be used in this example is based on the "Optimum start heating control (non-domestic)" example EMS script provided with the software. Follow the steps below to set it up for the analysis.
1. Click on the Scripts  toolbar icon to open the Script Manager dialog and click on the Enable scripts checkbox.
2. Click on the Script browse item. A list of the existing scripts appears in the Info panel to the right.
3. Open the EMS category and select the "Optimum start heating control (non-domestic)" script. Then copy that script to create a new custom script that can be edited, select it and click on the Edit Info toolbar icon to edit the copied script.
4. Change the name of the script to "Optimum start heating control with variable earliest start time"
5. Edit the script to set up the variable start time by changing the line below:
! earliest start time
SET TimeTosMin = 5,
to:
! earliest start time
SET TimeTosMin = <Var,EarliestStartTime,4>,
This Erl statement says that for standard simulations the variable is initialised to 4am, otherwise it is variable and initialised by the optimisation controller.
6. Check the Enable program checkbox to ensure that the script will be executed at runtime.
7. Press OK to confirm the changes to the script.
1. Run a standard simulation for the Winter typical week with hourly results and open the results in Results Viewer by clicking on the View EnergyPlus results  toolbar icon.
2. View hourly results for Optimum start time (a custom output generated by the EMS script) and Site Outdoor Air Drybulb Temperature on different graphs. You should see something like the screenshot below.
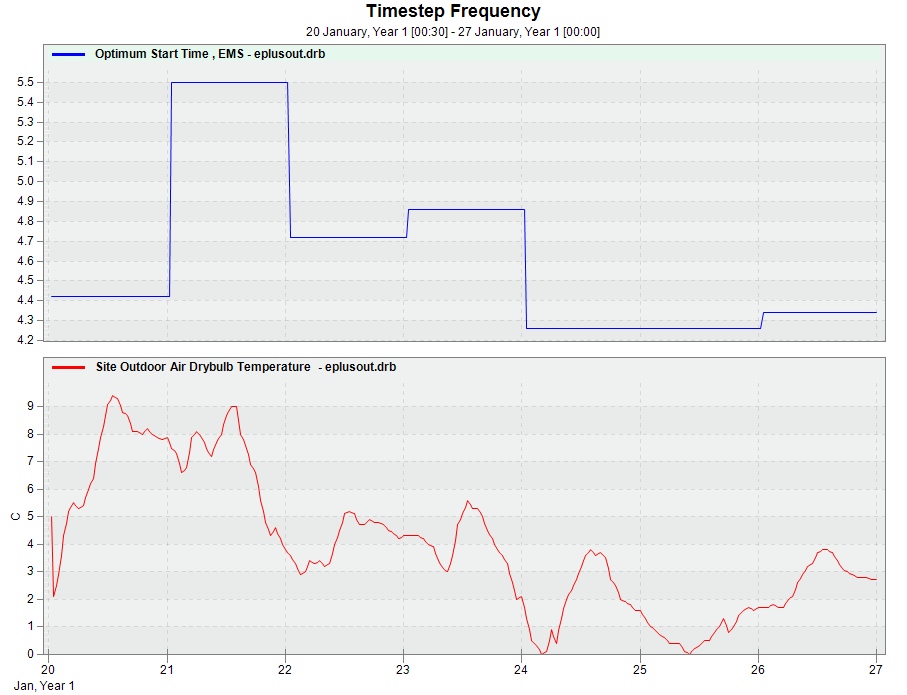
The Optimum start time output shows the time the heating system starts up for each day of the simulation vs the outdoor temperature. You can clearly see that the colder the outdoor air temperatures at 1am, the earlier the heating system starts. This confirms that our EMS controller is working as intended.
Now to find the best setting for the controller earliest start time (TimeTosMin in the EMS script) make the following settings on the Parametric, Optimisation and UA/SA Analysis Settings dialog.
1. Open the Parametric, Optimisation and UA/SA Analysis Settings dialog by clicking on the  toolbar icon and set the Analysis type on the Analysis tab to 2-Optimisation.
2. Go to the Objectives tab and add 2 new objectives to minimise Heating load and Discomfort ASHRAE 55 (all clo). You can either edit the existing objectives or first delete those and create 2 new objectives.
With both objectives defined, the Objectives tab should now be set up as follows:

Now set up a single design variable to vary the controller earliest start time.
1. Delete all but one of the existing variables and edit the last remaining variable
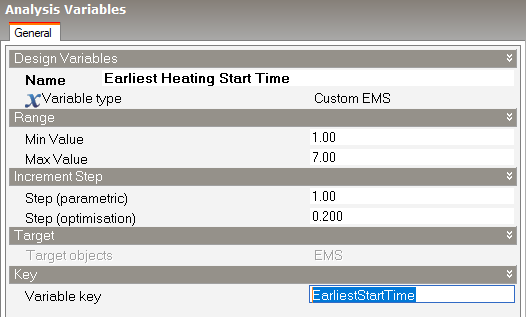
2. On the Edit Analysis Variables dialog, start by setting the Variable type to Custom EMS.
3. Set the Name to "Earliest Heating Start Time".
4. Set the Min value to 1, the Max value to 7 and the Step (optimisation) to 0.2. This will allow us to explore the impact of start times between 1am and 7am on heating load and discomfort.
5. Set Variable key to "EarliestStartTime" to match up with the <Var,EarliestStartTime,4>, setting in the script.
The dialog should now look like this:
5. Press OK to confirm.
Click on the Simulation tab and press update to re-run a base annual simulation. Before pressing OK, You should make the following settings:
1. Ensure you are running simulations for the whole year by clicking on the Annual simulation Info panel link.
2. Ensure you are generating only Annual/Monthly results by checking the Monthly and Run period interval and ensuring that all other outputs are switched off.
3. Select operative temperature control by clicking on the Options tab and selecting the 2-Operative temperature Temperature control option. This setting is advised because the ASHRAE 55 comfort assessment is based on operative temperature and it is important to consider the radiant effects especially when looking at morning time comfort which will be significantly impacted by cool wintertime internal surfaces in the mornings. If you select air temperature control instead you will see very different results.
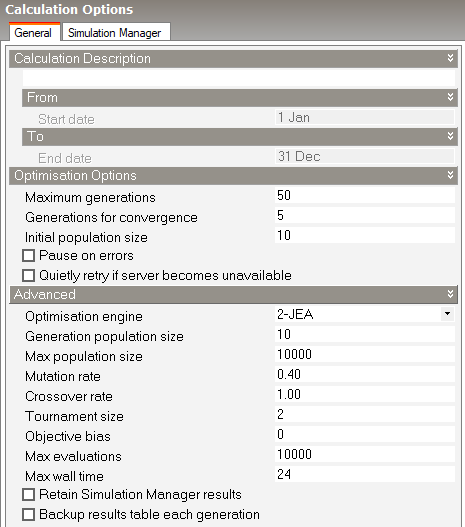
Navigate to the Optimisation + UA/SA tab and press the Update toolbar icon to open the Optimisation Calculation Options dialog and make the following settings. These should be the same or similar to the defaults.
Press the Start button to run the optimisation simulations.
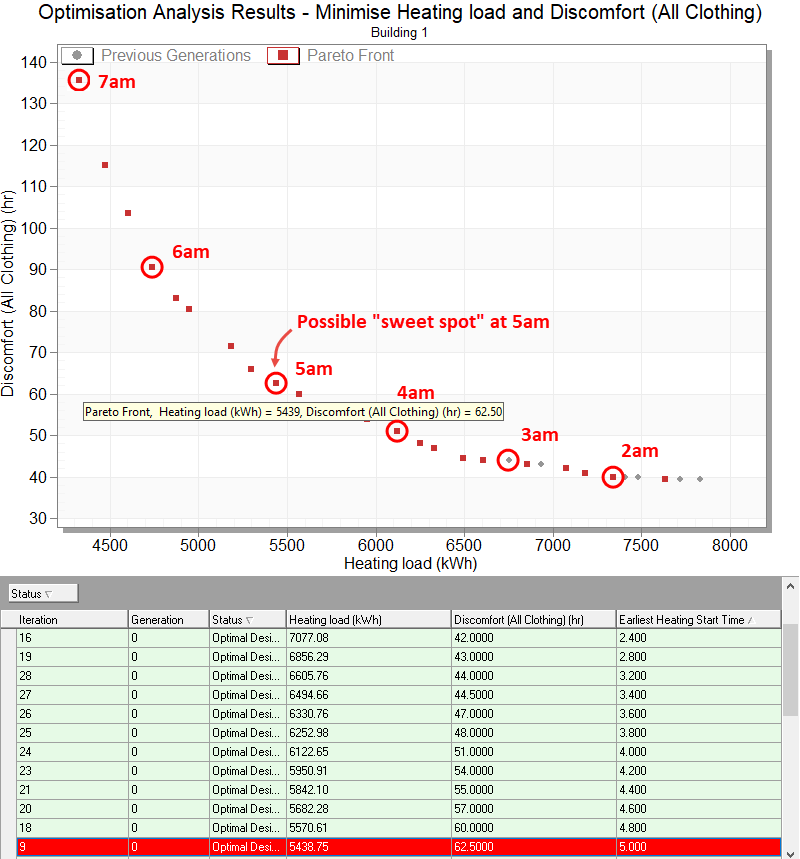
After the optimisation has completed and you have closed the Calculation Options dialog, the main screen should look similar to the screenshot below (the annotations in red were added manually). The graph shows how variations in the "earliest start time" affects heating load and discomfort. As expected, as the earliest allowed start time is reduced from 7am to 1am, the levels of discomfort decrease at the expense of higher heating energy.
The results also show diminishing returns in terms of comfort when reducing the earliest start time much below 4am. On the other hand small extra preheat time between 6am and 7am cause big improvements in comfort. The annotations propose a possible "sweet spot" selection at around 5am which gives rise to 5439 kWh annual heating load and 62.5 discomfort hours.
Tip: Although the analysis described in this example uses the Optimisation analysis type, because there is only one variable, the results actually look more like those from a parametric analysis, but with 2 outputs one on the x-axis, the other on the y-axis. Another way to do a similar analysis would be to use the Parametric analysis analysis type instead of Optimisation, adding Heating load and Discomfort hours as Outputs instead of Objectives.