This tutorial shows you how to set up an optimisation analysis using Custom Script variables to modify the model. You will learn how to use scripts to set up cooling and heating setpoint temperature variables and to identify optimal settings that simultaneously minimise occupant discomfort and annual carbon emissions.
The tutorial model uses a default Simple HVAC fan coil unit system, though the same process would work equally well using Detailed HVAC.
The main learning points are:
1. Create a new model located at London Gatwick.
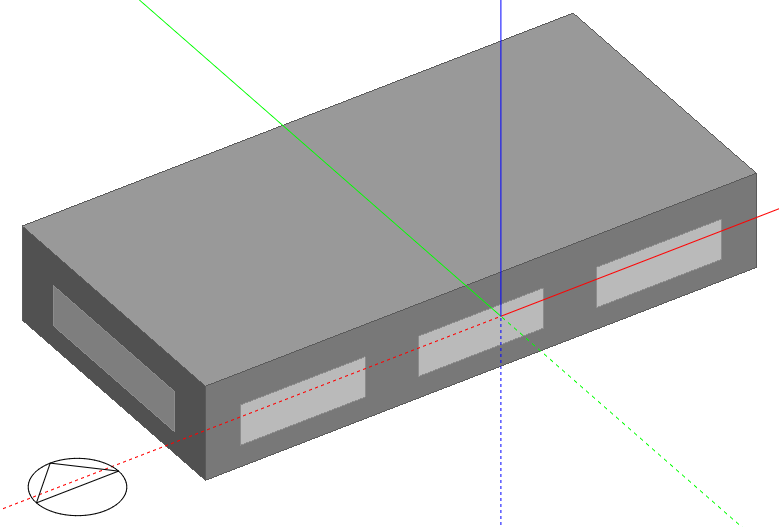
2. Add a building using default settings and draw a rectangular block measuring 20m by 10m with block height of 3.5m as shown below.
3. Load the Generic Office Area Activity template at building level on the Activity Tab.
First set up the design objectives for the study by making the following settings on the Parametric, Optimisation and UA/SA Analysis Settings dialog.
1. Open the Parametric, Optimisation and UA/SA Analysis Settings dialog by clicking on the  toolbar icon and set the Analysis type on the Analysis tab to 2-Optimisation.
2. Go to the Objectives tab and add 2 new objectives to minimise Operational CO2 Emissions and Discomfort ASHRAE 55 (all clo). You can either edit the existing objectives or first delete those and create 2 new objectives.
With both objectives defined, the Objectives tab should now be set up as follows:

Now set up 2 design variables to vary the heating and cooling setpoint temperatures.
1. Delete all but 2 of the existing default variables and edit the first remaining variable.
2. On the Edit Analysis Variables dialog, start by setting the Variable type to Custom Script.
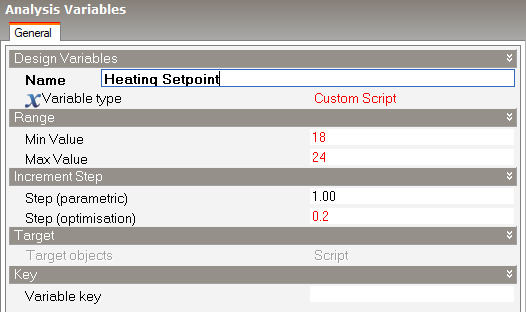
3. Set the Name to "Heating Setpoint".
Note: The name entered here on the Edit Analysis Variables dialog must match the corresponding name used in the custom script described below. You may like to copy the name and paste it somewhere safe where you can easily access it later when writing the script.
4. Set the Min value to 18, the Max value to 24 and the Step (optimisation) to 0.2.
5. The Variable key is not used in this analysis and can be left blank.
The dialog should now look like this:
5. Press OK to confirm.
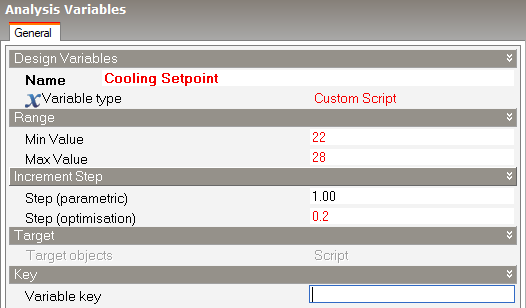
6. Now follow a similar procedure to set up the Cooling Setpoint variable. The dialog should look like this after you have finished defining the second variable:
If you are using v7 or later you can choose whether to use Python or CS-Script for this next step. Otherwise in v6 CS-Script is the only option.
The script to be used in this example is based on the "CS example: Custom Hook" example EMS script provided with the software. Follow the steps below to set it up for the analysis.
1. Click on the Scripts  toolbar icon to open the Script Manager dialog and click on the Enable scripts checkbox.
2. Click on the Script browse item. A list of the existing scripts appears in the Info panel to the right.
3. Open the CS-Script category and select the "CS example: Custom Hook" script. Then copy that script to create a new custom script that can be edited, select it and click on the Edit Info toolbar icon to edit the copied script.
4. Change the name of the script to "Heating and Cooling Setpoints"
5. Edit the script to apply the heating and cooling setpoints proposed by the optimiser to the model as follows:
using System.Collections.Generic;
using System.Linq;
using System.Windows.Forms;
using DB.Api;
using DB.Extensibility.Contracts;
namespace DB.Extensibility.Scripts
{
public class RunCustomScript : ScriptBase, IScript
{
public override void OnDesignVariableChanged(int optVarId, string variableCurrentValue)
{
Site site = ApiEnvironment.Site;
Table table = site.GetTable("OptimisationVariables");
Record record = table.Records.GetRecordFromHandle(optVarId);
string optVariableName = record["Name"];
// match names given to Custom Script type variables in "Optimisation Analysis / Variables" dialog
if (optVariableName == "Heating Setpoint")
{
// Actions for first custom script variable
// Set Heating Setpoint to Variable Current Value
foreach (BuildingBlock block in ActiveBuilding.BuildingBlocks)
{
foreach (Zone zone in block.Zones)
{
double heatingSetpoint;
heatingSetpoint = double.Parse(variableCurrentValue);
zone.SetAttribute("HeatingDesignSetPointTemperature", heatingSetpoint.ToString());
}
}
}
// match names given to Custom Script type variables in "Optimisation Analysis / Variables" dialog
else if (optVariableName == "Cooling Setpoint")
{
// Set Cooling Setpoint to Variable Current Value
foreach (BuildingBlock block in ActiveBuilding.BuildingBlocks)
{
foreach (Zone zone in block.Zones)
{
double coolingSetpoint;
coolingSetpoint = double.Parse(variableCurrentValue);
zone.SetAttribute("ActiveCoolingDesignSetPointTemperature", coolingSetpoint.ToString());
}
}
}
}
}
}
The OnDesignVariableChanged hook point is called once for each variable when the model is being prepared for the simulation. The value of optVariableName passed in via optVarId defines the variable being handled and the value of variableCurrentValue also passed in provides the value of this variable for this simulation. The script simply loops through the blocks and the zones and copies the setpoint requested in variableCurrentValue to the zone attribute.
ActiveBuilding in this case is a reference to the parametric clone copied from the base model for each simulation and so it is safe to apply any parametric changes to it without affecting the base model.
Follow the steps below to set up the Python script for the analysis.
1. Click on the Scripts toolbar icon to open the Script Manager dialog and click on the Enable scripts checkbox.
2. Click on the Script browse item. A list of the existing scripts appears in the Info panel to the right.
3. Click on the Python-Script category and press the Add  Info panel icon to create a new Python script.
4. Change the name of the script to "Heating and Cooling Setpoints"
5. Edit the script to apply the heating and cooling setpoints proposed by the optimiser to the model as follows:
def on_design_variable_changed(opt_var_id, variable_current_value):
site = api_environment.Site
table = site.GetTable("OptimisationVariables")
record = table.Records.GetRecordFromHandle(opt_var_id)
opt_variable_name = record["Name"]
if opt_variable_name == "Heating Setpoint":
for block in active_building.BuildingBlocks:
for zone in block.Zones:
heatingSetpoint = str(variable_current_value)
zone.SetAttribute("HeatingDesignSetPointTemperature", heatingSetpoint)
elif opt_variable_name == "Cooling Setpoint":
for block in active_building.BuildingBlocks:
for zone in block.Zones:
coolingSetpoint = str(variable_current_value)
zone.SetAttribute("ActiveCoolingDesignSetPointTemperature", coolingSetpoint)
Tip: To save time you can copy the above script and paste it into the dialog. Note that Python requires the indentation as part of its syntax and when you paste the above script the indents may become lost. In this case you must insert the indents manually after the paste. The easiest way to do that it by using the <Tab> key.
The on_design_variable_changed hook point is called once for each variable when the model is being prepared for the simulation. The value of opt_variable_name, passed in via opt_var_id, defines the variable being handled and the value of variable_current_value also passed in provides the value of this variable for this simulation. The script simply loops through the blocks and the zones and copies the setpoint requested in variable_current_value to the zone attribute.
active_building in this case is a reference to the parametric clone copied from the base model for each simulation and so it is safe to apply any parametric changes to it without affecting the base model.
Note: Comparing the scripts in 4a and 4b you can clearly see how the Python version is more compact and clearer to read than the CS-Script equivalent. For this reason Python will generally be the preferred scripting method for non C# developers.
6. Check the Enable program checkbox to ensure that the script will be executed at runtime.
7. Press OK to confirm the changes to the script.
Click on the Simulation tab and press update to run a base annual simulation as a necessary step before running the optimisation. Before pressing OK, You should make the following settings:
1. Ensure you are running simulations for the whole year by clicking on the Annual simulation Info panel link.
2. Ensure you are generating only Annual/Monthly results by checking the Monthly and Run period interval and ensuring that all other outputs are switched off.
Leave all other settings in their default state.
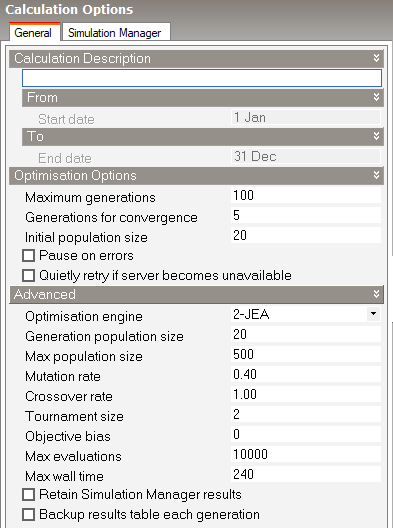
Navigate to the Optimisation + UA/SA tab and press the Update toolbar icon to open the Optimisation Calculation Options dialog and make the following settings. These should be the same or similar to the defaults.
Press the Start button to run the optimisation simulations.
After the optimisation has completed and you have closed the Calculation Options dialog, the main screen should look similar to the screenshot below (the annotations were added manually).
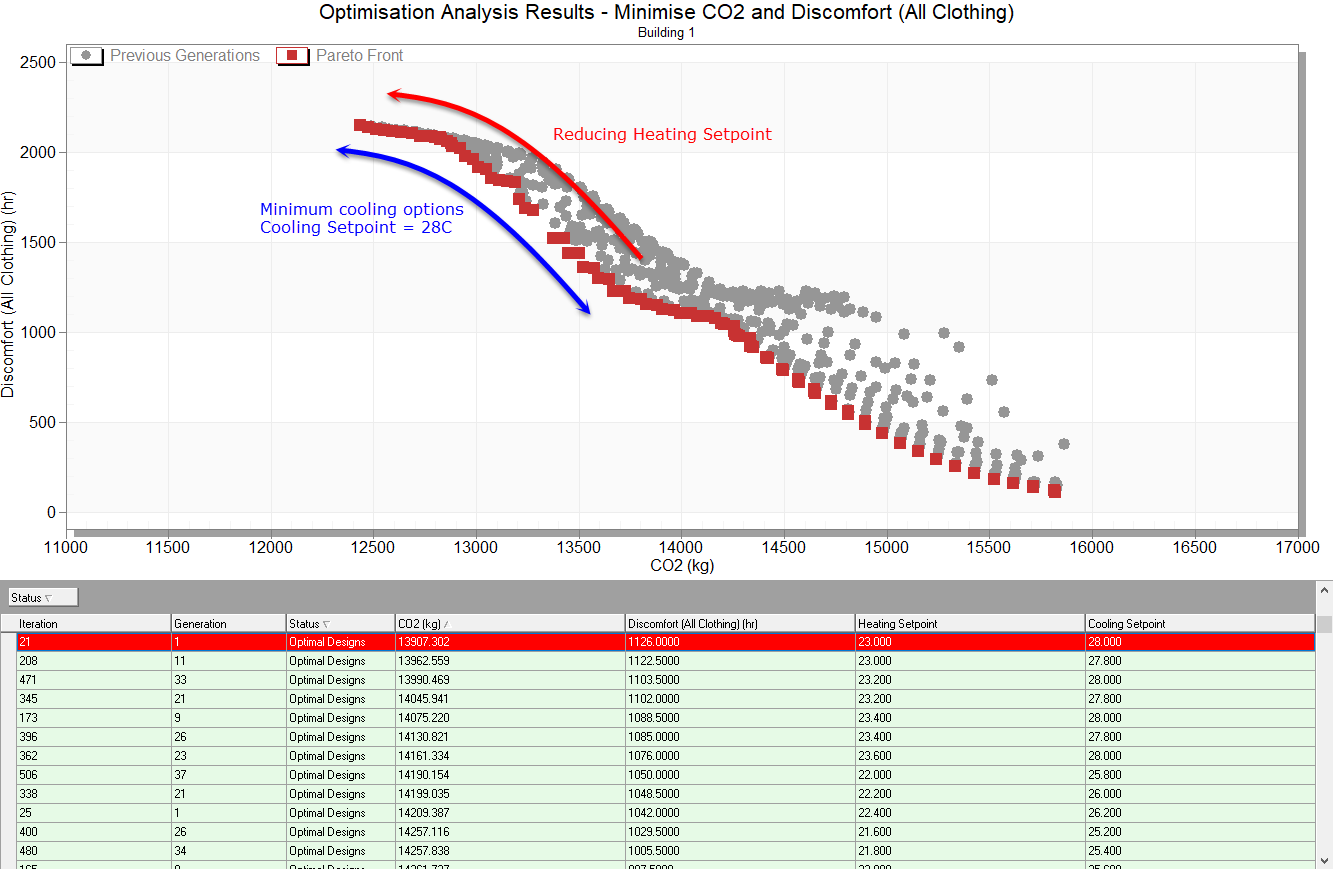
The graph shows how carbon emissions tend to be higher for more comfortable optimal solutions, i.e. that there is a "tension" between discomfort and heating and cooling energy use. Depending on how we prioritise occupant comfort over energy use / environmental impact there is a range of optimal heating and cooling setpoint temperatures.
The top left group of Pareto points represent the options with cooling setpoint at its highest allowed value of 28°C.
Note: The logic used to modify the setpoint temperature is applied in a simple way in this tutorial to illustrate how to use Custom script variables to make basic changes to the model. Actually, you could have reproduced exactly the same analysis without writing scripts using the built-in Heating setpoint temperature and Cooling setpoint temperature variable types! However in a real project there might be a requirement to make corresponding adjustments to natural ventilation setpoint temperatures or other changes that should respond to changes in the design variable. More complex design variables like this can easily be set up by making the necessary adjustments to a script such as the one used in this tutorial.