Block tab on Model Options dialog.
![]()
You can edit certain aspects of a building block geometry by clicking on the Model options icon while at the block level. This opens the Model Options dialog box with the Block tab open.
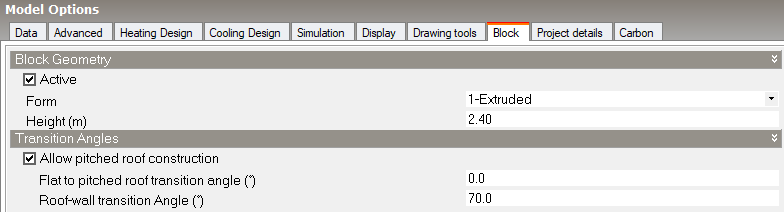
Note: This tab is only enabled when the Model options dialog is opened at Block level in the model
Keep this checkbox checked if the block is to be accessible for editing etc, i.e. it is not "ghosted". However, there may be times when it is helpful to ghost the block so that it becomes semi-transparent allowing blocks behind to be accessed, selected and edited. In this case this checkbox can be unchecked.
Tip: It is usually more convenient to control the ghosting of blocks through the Ghost Blocks toolbar icon while at building level.
Once a block has been created its Form can be changed retrospectively by making a selection from the drop list. Options are typically:
If the block has 5-General block form due to a previous block edit operation, then only these block form options are available:
Tip: When you change the form of a block from 1-Extruded to 3-Pitched Roof or 2-Sloping Walls the original form will be remembered so that even if you have edited the block by cutting it or dragging a face, when you convert the form back to 1-Extruded, the original modified form will be restored.
For blocks of 2-Sloping wall form only, enter the slope angle between horizontal and the sloping walls. A slope of 10° means a shallow slope and 80° means a steep slope.
The height setting is used for the 1-Extruded and 2-Sloping wall block forms to create the block geometry. It can be retrospectively changed here.
For blocks of 3-Pitched roof form only, check this option if the pitched roof should be generated using a gable, where possible.
For blocks of 3-Pitched roof form only, enter the extent of the pitched roof overhang (in m or ft).
For blocks of 3-Pitched roof form only, enter the slope angle between horizontal and the sloping pitched roof elements. A slope of 10° means a shallow slope and 80° means a steep slope.
If pitched roof constructions are to be differentiated from external wall and flat roof constructions for the current block then this checkbox should be checked. This is the default setting and enables two further settings (below) to control how DesignBuilder classifies block surfaces as being external wall, pitched roof or flat roof. Alternatively, you can force all non-horizontal surfaces to be walls by unchecking this option.
By default only roofs that are horizontal are treated as a flat roofs, but this block level setting can be used to allow non-horizontal roofs to be treated as flat as well. For example if 10° is entered here then any roof surfaces of slope <= 10° in the block will treated as flat roof surfaces and the appropriate construction will be used in simulations. Also the appropriate thermal bridging settings will be used.
When the Allow pitched roof construction option is checked you can enter the angle which defines the surface slope below which a wall becomes a roof. For example a setting of 70° means that any block surfaces steeper than 70° will be treated as external walls (using external wall constructions, glazing layout etc) and those less steep than 70° will be treated as pitched roof surfaces (using pitched roof constructions, roof glazing layout etc).