
Site network licenses require a license server application to be installed and run on a server on the network. DesignBuilder runs on the client machines on the same Windows network and obtains licences from the license server on a concurrent basis.
In summary, the steps to set up DesignBuilder Site Licenses are:
The above steps are detailed below.
With Site Network Licenses the License file is obtained through the activation code you received when ordering the software.
If your server computer has no internet connection then activate.cmd will not be able to connect a browser window to the designbuilder.co.uk web server and you will have to activate manually by following these steps:
The server can be run directly by double clicking rlm.exe. This runs a command window and logs activity to the window. This is useful when you first run the license server as you'll be able to see the license server starting up correctly and loading the license file as well as DesignBuilder clients obtaining licenses from the server.
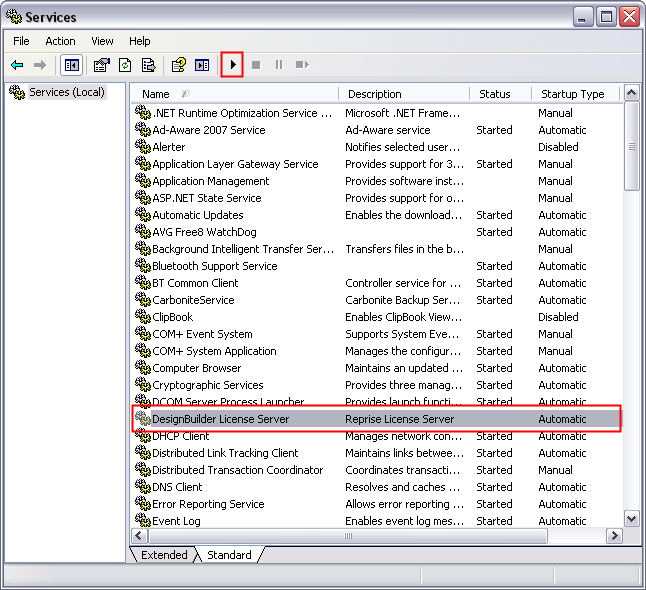
It is best to set RLM up to run as a Windows service rather than in the command window, otherwise you'll need to remember to manually restart the license server when the computer reboots.
If you are running RLM in a command window you should close that before starting up RLM as a service.
To create the Windows service to run RLM automatically double click on service_install.cmd or use Manage Windows Service in the admin interface.
If the service_install.cmd does not run then open a command window with elevated privileges from Start> right click on Command prompt to run as admin, then cd to RLM folder and type service_install and press Enter key. See below for details.
Note: The service will be added to Windows services but not started.
Use Control Panel > Services to start DesignBuilder License Server.
Once started in this way the service will restart automatically if the computer is rebooted. By default the service will write a log file designb_rlm.log into the rlm installation folder. If you want this in a different location you can use the admin interface (above) to set up the service then you can specify the service name and the log file location.
You may experience problems with permissions when setting up the service. You can either disable the UAC or try right clicking service_install.cmd and choosing "Run as administrator".
Even this doesn't always give you access to the Service Control Manager. You can check this by running a cmd prompt, changing folder to the license server installation folder and running the RLM install service command (below).
If you edit service_install.cmd you'll see the command being executed is:
rlm -install_service -dlog "%CD%\designb_rlm.log" -service_name "DesignBuilder License Server" -c "%CD%"
If you see this error returned "Error: Access to Service Control Manager denied" you can get over this by running cmd as administrator and then run the install command. To do this right click Command Prompt on the start menu and run as administrator. Change folder to the license manager installation folder and run the rlm.exe -install_service command given above and it should work.
In case of trouble, add inbound windows firewall rules to server machine, to always allow TCP ports 5053, 5054. If you set fixed ISV port for port-forwarding method of off-site access (See Troubleshooting section) then also add and fixed ISV port e.g.49670 as an inbound TCP port-allow rule. If necessary, also allow TCP ports 2600 and 2700 inbound.
More on this in the License Manager FAQs at https://www.reprisesoftware.com/support/faq.php
RLM provides a browser-based administration interface to the license server. To run this, double click on the admin_interface.cmd file in the RLM folder using Windows Explorer.
Refer to the RLM End User Manual (double click online_manual.cmd) for more details on using the admin interface.
Note: DesignBuilder does not use the Activation page of the admin interface.
Reprise Software, developers of the RLM licensing system, always maintains a current version of the RLM End User's Manual here:
https://www.reprisesoftware.com/RLM_Enduser.html
If you purchase additional seats for a site network license system, the new licenses are provided in the form of a lic file download. The process of obtaining the additional lic file is the same as described above under Obtaining your License File. The new lic file does not replace the existing lic files, but is used in addition to the existing licenses. The license server reads these multiple lic files, licenses from multiple lic files adding to give the total number of seats of concurrent use that are allowed.
This steps involved in pointing client machines to the License Server is described on the main Licensing & Activation page. From DesignBuilder you can check out or check back in module licenses using the License Manager which can be accessed from the Help menu.
Normally when the Client machine can’t see server it displays "-17 communications error" and "-111 Connection refused at server". In that case the access to the server is probably being blocked.
The RLM Licence server uses random ports. So, the best solution is not to allow exceptions by port, but instead by program, eg. open all ports used by "rlm.exe".
But if the server is behind a firewall that you have to specify pinholes to get access then follow these instructions:
In order to specify what port the second service uses you will have to edit the lic file.
On the ISV designb line of the lic file (that will be the 2nd line) add the following:
The remote user will need to login through your VPN connection and access the server that is hosting the network license. DesignBuilder site licence is IP based.
After activating the site license activation code, download the .lic license file, open the file in a text editor, with admin rights. Example:

Now, on the second line you should see "ISV designb" but the "port=..." part is probably not present.
Be sure to insert after "designb", a space, followed by "port=", followed directly by a port number – one example is 49670.
Then save the lic file and restart the service.
This instructs the licence server to use a fixed "ISV port" as specified, instead of randomly choosing the port number from a range each time the server is started (default behaviour, good for security but it makes port-forwarding for off-site access unachievable).
In the router used by the licence server, set up port forwarding from WAN TCP port 5053, to LAN TCP port 49670 or whatever you chose as your fixed ISV port. Forward to the LAN static IP of the licence server machine.
All clients, whether on LAN or WAN, must then access the server using port 5053. When on WAN, for host name they must use the server's WAN static IP or DDNS host address as the host name. This means when a staff member moves in/out of the office with their laptop, they have to switch the hostname in their DesignBuilder (client) licence settings (unless you have something clever set up on your network to make this seamless). The VPN approach is probably more convenient in this respect.
Note: It is the customer's responsibility to consider security concerns when opening ports etc. DesignBuilder Software Limited shall not be held responsible for damages due to a security breach.
The DesignBuilder licence server is based on the Reprise Licence Manager (RLM) software in case you have prior knowledge of this platform.