An assembly block (or just assembly) is a collection of (usually connected) component blocks used to create an object of some sort. Assemblies can be used to create internal objects such as furniture, people, stairs, or external objects such as shading systems, trees or buildings.
Custom assemblies can be created from existing component blocks that you draw and are added to the Assembly Library before being placed. Once added to the library they can be loaded to the model (placed) either at building level (external assemblies) or at block level (internal assemblies).
Some typical applications of assemblies are:
Creating internal objects with CFD boundary conditions, such as occupants or screens with convective gains spread over their surface.
Creating shading devices for EnergyPlus simulations, cooling design calculations and daylighting studies.
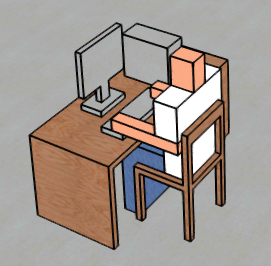
In general, assemblies are used and behave very much like standard component blocks. Like component blocks, assemblies are used at building level in EnergyPlus simulations, and at both building and block level for CFD, Daylighting and Visualisation. They can be used to shade and reflect in EnergyPlus simulations and Radiance daylighting calculations and they show up on visualisations using the texture associated with the material selected for the underlying component blocks. If different component blocks within an assembly have different materials selected then the assembly is displayed with corresponding multiple textures as shown below.
One important advantage of using assemblies over component blocks is that it is possible to edit the size or form of one instance of an assembly and all similar instances are automatically updated at the same time. This allows a large number of geometries to be edited in once go which can be useful for quickly editing large amounts of façade geometry.
Note: To edit the form of an assembly so as to make the same edit to all other similar assembly instances you must first navigate down to the assembly and edit the form of the underlying component block(s). The Add surface, Drag face and the Cutting block edit tools can be used in this case. It is possible to edit individual assemblies without affecting similar instances by making the edit using the Stretch tool while at building level. This is the only block edit tool that can be used to change the form of an assembly without affecting the other instances.
Once an assembly has been added to the library it can be placed either at building or block level. For example to place a chair assembly from the library (DesignBuilder comes with a small assembly library which includes a chair):
Navigate to the block where the chair is to be placed.
Click on the Place assembly icon 
The Drawing options panel is displayed in the bottom left of the screen.
Select the Chair assembly from the dropdown list of available library assemblies.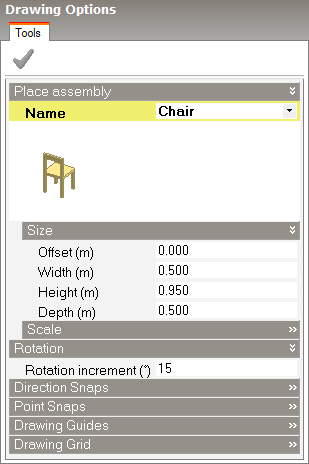
If you would like to change the dimensions of the chair to be placed (or its offset from the floor plane) you can do so by changing any of the Offset, Width, Height, Depth and X, Y, Z Scale settings in the Drawing options panel.
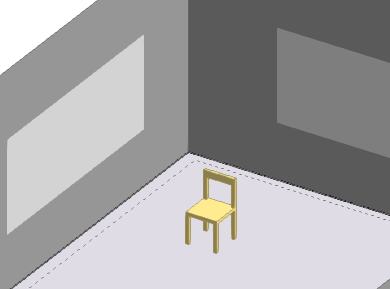
Move the mouse to the location in the block where the chair is to be placed. As you move the mouse around the block different selection planes become available. In this case you will place the chair on the floor. Note that the place where you click on the floor will position the part of the chair that was defined as the attachment point when the assembly was added to the library.
Click to define the location of the assembly attachment point.
Now define the orientation of the chair by moving the mouse. It is usually easiest to move the mouse away from the object being placed during this process to give you the finest control. As you move the mouse the rotation of the chair will be adjusted. Once the rotation of the chair is as required click again with the mouse to complete the placement.
The Place assembly command remains active allowing you to place more assemblies. To close the command press the <Esc> key.
See also: