Create New Location
Accessed by selecting the Create New Location radio button in the top left of the map.
To generate hourly weather data for a location that does not have a station on the map, start by navigating to the relevant region of the map so you can more easily select the location of the new virtual station and surrounding stations.
Then click on the Create New Location option to open the Station dialog which provides some simple controls to allow you to create your own "virtual" weather station by interpolating between up to 4 base stations.
Steps
1. On the opening “Station” tab enter a name for the new station by typing into the "Name" textbox.
2. The location of the new virtual station is defined as a latitude / longitude pair. The values can be set most easily by clicking on the "Get Location" button which temporarily closes the Station dialog allowing you to select the location on the map by left-clicking with the mouse. Once you have clicked to define the location, the Station dialog is reopened with the latitude and longitude settings filled in. Latitude is defined in degrees North of the equator and Longitude is defined in degrees East of the Greenwich meridian.
To return to the Station dialog without selecting the location of the virtual station press the <Esc> button.
Alternatively, you can manually enter the site latitude and longitude without using the "Get Location" tool.
3. Enter the site Elevation of the virtual site in m above sea level, if you know it. Otherwise, if you leave the "Elevation" text box blank then Climate Analytics will interpolate for elevation based on the distance between the selected location and the various base stations with known elevation.
4. Use the "Add" button to add 2, 3 or 4 nearby existing stations to be used as base stations for interpolation. Ideally you should select base stations with the best quality data possible, i.e. those represented by green dots on the map. Also, you should aim to select stations that have a similar climate to that of your new virtual station. For example avoid using base stations with significantly different elevations or proximity to large bodies of water to your location.
To return to the Station dialog without selecting a station to add press the <Esc> button.
The "Clear Last" and "Clear All" buttons can be used to remove just the most recently added base station, or all added base stations respectively.

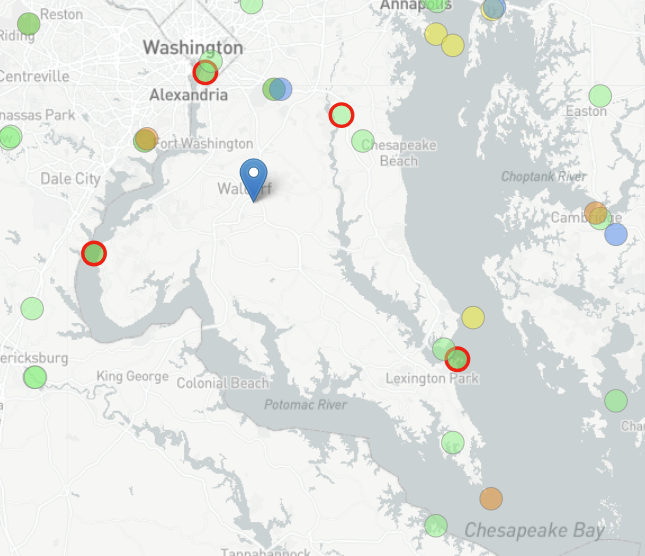
The virtual station’s location is pin pointed on the map with a blue marker, along with the base stations which are circled in red as shown below.
5. Click on the "Interpolate" button to generate the virtual station. When the data for the virtual station has been generated, the “Analysis” and “Download” tabs become available to allow the new station’s data to be checked and/or downloaded in epw form.
After clicking on the Interpolate button you are taken to the "Download" tab.
When downloading data for a new virtual station, Climate Analytics will generate hourly weather data by interpolating between the data sets for the selected base stations.
Once you have finished your “Create New Location” session you can close the dialog. You will be asked to confirm that you wish to close the dialog and lose all settings and selections made.

Press “OK” to close the dialog, in which case the Option in the left-hand panel is set to “Climate Analytics Data” and any locations and virtual stations set up in your "Create New Location" session will be lost. Or if you wish to make further changes, press “Cancel” to return to the Station dialog.
Files
You can save the settings used to create a new virtual station by clicking on the "Files" button and then the "Save Station" button. The file is saved in XML format with a .bimclimx extension and can be reloaded in future to reinstate all of the settings currently on the dialog.

Data for a new location is calculated from that of the selected existing stations using an Inverse Distance Weighted (IDW) interpolation method where measured values closest to the new location have more influence on the predicted value than those farther away. Weighted averages and the reciprocal of the distance between the existing stations are used in the calculation. The equation to calculate a data item for the new station is:
Datanew = Σ (Datai (1 / Distancei)) / Σ (1 / Distancei)
Where:
Datai is the data item value for existing station i
Distancei is the distance between the new station and existing station i
The Climate Analytics approach to creating to new locations is based on the understanding that some local knowledge of local conditions is important and, for most accurate results, it is best to select from a few known appropriate stations for interpolation. For example if your new location has 3 nearby stations, 2 of which are of similar elevation/climate etc, but the other is at a much higher elevation at the top of a hill, then the 2 similar stations should be selected for interpolation and not the station at the top of the hill.
Particular attention should be paid to the elevation of the stations used for interpolation. The ASHRAE 2009 Handbook says: It is especially important to note the elevation of locations because design conditions vary significantly for locations whose elevations differ by as little as a few hundred feet.
An alternative method that could have been adopted in Climate Analytics is an automated gridding approach. This would have been quicker to use, however it would ignore any local knowledge of the most appropriate nearby stations to choose and so could potentially result in inaccurate weather data being generated for the new location.