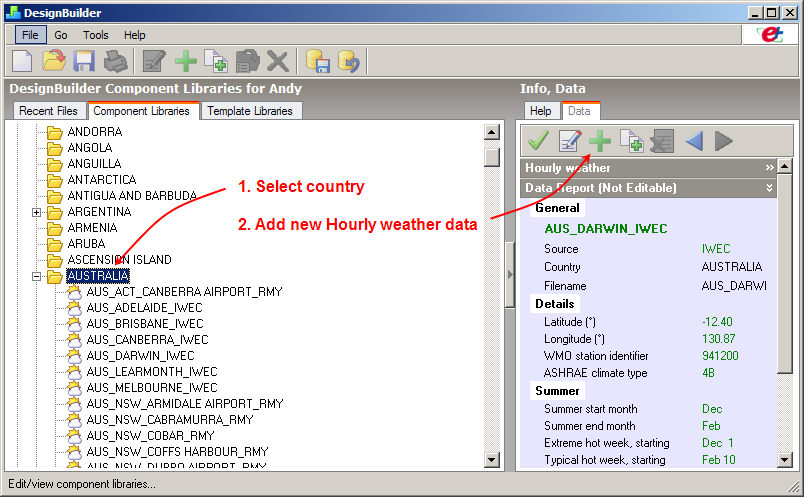
If you have hourly weather you wish to use in simulation you can add it to the library by following the steps below:
See further below for the alterative steps to follow if you have a file open and wish to create a new hourly weather data set just for that model.
Note 1: Any custom hourly weather epw file you select in your model will be saved with the dsb file so that the model can be used on other computers without the need to copy weather files manually.
Note 2: Although DesignBuilder can been used with any valid epw data sets, you are strongly advised to process the data first to ensure that each hourly record has year 2002. This ensures that daily, hourly and sub-hourly data generated by EnergyPlus is correctly synchronised with the DesignBuilder graphics display. If you do not set the year to 2002 it will not affect the results but it will affect the day of the week display in DesignBuilder graphic output. In particular, daily, hourly and sub-hourly data will not necessarily show the correct day of the week in the results display graphics.
The steps are shown in the screenshots below.
In the Hourly weather data, enter the details of the location and select the EnergyPlus epw filename as shown below.
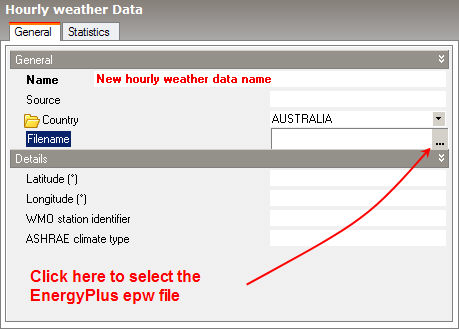
Once the epw has been selected, DesignBuilder loads the Latitude, Longitude and WMO station identifier.

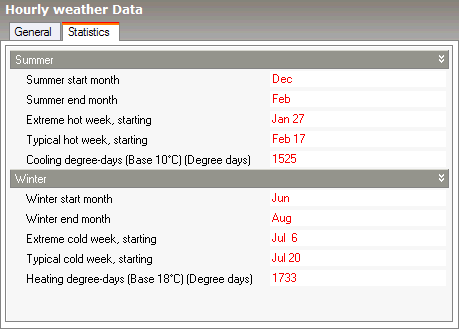
It also searches for the equivalent .stat file and if it is found (in the weather data folder) the data on the Statistics tab is also loaded (below).
Note: If a stat is not available you should enter the information on the Statistics tab by hand in the format shown above. The stat file is automatically generated by the Hourly weather data translation process.
When you click on the OK button you will be able to select this new Hourly weather data from:
The above process creates a library Hourly weather data component. If you have a dsb file open, you can follow an equivalent process to create a model Hourly weather data component. In this case the process is:
In this case you will need to export the hourly weather data you have just created from this model and reload the ddf file to the library if you wish to use the weather data in other models.
If you don't have the data in epw format yet then it can be translated from a range of formats using the inbuilt DesignBuilder weather data translation tool or if the format is not supported then you can use the EnergyPlus translation tool that supports all weather formats. Obtain this from the EnergyPlus website. The documentation can be found in the Auxiliary Programs document. It can be worth contacting EnergyPlus support about obtaining weather data for particular locations as they have a lot of contacts and sometimes can provide data that is not on the main website.
While EnergyPlus is quite flexible in the format of the data used in simulations, DesignBuilder requires:
In some cases you may need to simulate a period longer than a year, possibly using custom weather data. Because DesignBuilder simulations can run for a maximum of a year, you would need to run 2 separate simulations to achieve this. Each simulation would use the appropriate weather file. For example to simulate the period September 2008 to December 2009 you could create 2 weather files, one for 2008 and the other for 2009 and run simulations for the 2 years separately. Results for the 2 simulations could be combined afterwards outside DesignBuilder (e.g. in a spreadsheet).